

Created
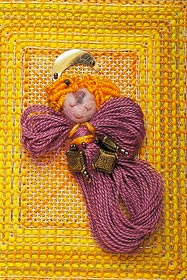
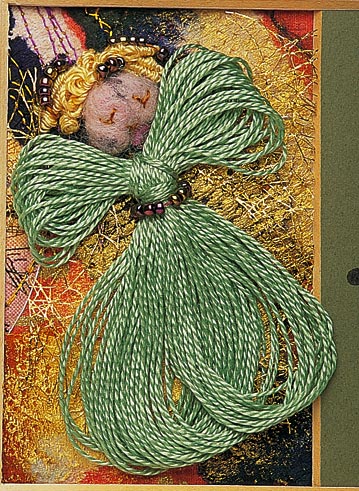
from simple tassels, Linda Westerman's angels
are fun to make - and when it comes to adding
individual touches you can allow your creativity
to run wild.
photos
by Ian Cole
Stitched area: 10.5 x 8 cm
What you need
Apart from the gold Jap, all threads are in colours of your own choice.
Background
- 16 x 16 cm 18 count canvas
- Imitation gold Jap No. 12
- Pearl cotton No. 8
- Pearl cotton No. 5
- Tapestry needle
- Small embroidery frame
Angel
- Pearl cotton No. 8
- Small piece of off-white felt and a little padding
- Selection of small beads
- Large sequin (round or crescent-shaped)
- Small beading needle
- 5 x 7 cm piece of firm card
What you do
Background
- Measure a rectangle 4 x 7 cm in the centre of the canvas. The first row of couching is worked around this rectangle.
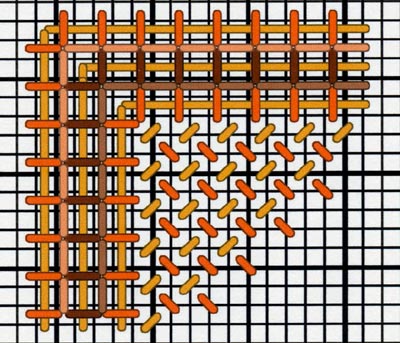
- To couch the first row, lay the gold Jap between two threads of canvas and, using the pearl cotton No. 5, couch it in place around the measured rectangle, spacing the couching stitches as shown in chart 1.
- Referring to chart 1 as a guide, couch further rows of gold Jap around the border, leaving one channel of canvas between each row. To create a rich effect, work at least five rows of couching.
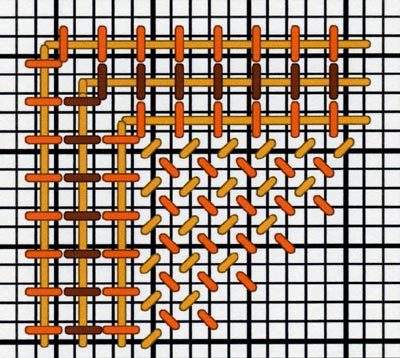
- When couching is complete, work back stitch between the rows of couching, as shown in chart 2.
- Using either pearl cotton No. 8 or a fine metallic thread, work rows of running stitch diagonally across the centre rectangle (see chart). This will create a darning pattern.
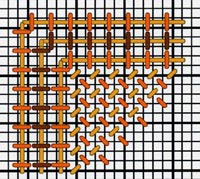
chart 1 - closer
view
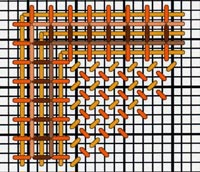
chart 2 - closer
view
Angel
- Wrap the pearl cotton around the 7 cm depth of the card about 60 times.
- Carefully slide the uncut tassel off the card. Wrap a length of pearl cotton around the tassel one-third from the top, then divide the top into two to create the wings.
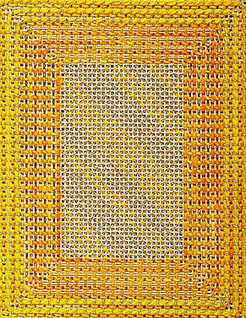
The
canvaswork background
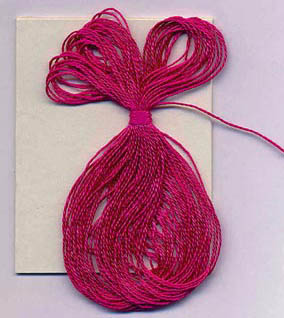
Wrap
a length of thread around the tassel
and divide for the wings
- Position the tassel on the canvas background. To anchor the angel to the canvas and create the bodice shape, work a few stitches firmly over the waist and wings, taking the stitches through the canvas.
- Cut a small circle of felt for the head. Work a gathering thread in running stitch around the edge of the circle then pull up the stitching so that the edges curl inwards. Push a tiny bit of wadding into the back of the felt and draw up the gathering thread until the head is the right size.
- Position the head on the body and stitch in place. Use tiny stab stitches and work them at an angle under the edge of the head so that they cannot be seen.
- The eyes and mouth are worked in tiny fly stitches with ordinary sewing thread or a single strand of stranded cotton. Do not pull the fly stitches too tight or the head will become squashed!
- The hair is worked in french knots (or bullion knots, if preferred) and can be used to give a very individual air to your angel.
- Have fun decorating the skirt and bodice of the angel with beads, buttons or other exciting bits from your collection.
- Position the crescent-shaped sequin behind the angel's head as a halo (or cut the crescent shape from a round sequin). Attach with straight stitches worked over the sequin or by stitching through a bead and through the end of the sequin.
Suggestions
- Use metallic, textured or random-dyed threads for the angel tassel
- Create a variety of backgrounds as shown in the 'Gallery' - let your imagination run wild!
Gallery
You can let your imagination run wild when it comes to creating backgrounds and adding individual touches to your angels. Here are some suggestions:
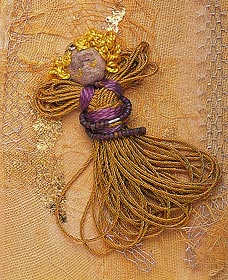
On
a scrim background decorated with strips
of gold mesh, this well-dressed angel is
made from metallic yarn and decorated with
a loose wrap of strung beads.
Closer
view

This
angel, hovering at the edge of a card 'door',
has a belt of strung beads, and some of
the same beads are used in the hair.
Closer
view
 Your basket